What is an Ultrasonic Level Sensor? – Principle, Applications, Installation & Calibration Explained
Published on July 24, 2024 | Category: introductionShare this Page:
An Ultrasonic Level Transmitter is a type of non-contact level sensor used for measuring the level of liquids or solids in a tank, silo, or open channel. It works on the principle of emitting high-frequency ultrasonic pulses from a transducer toward the surface of the material being measured. These pulses bounce back from the surface, and the sensor calculates the level based on the time it takes for the echo to return. This method enables continuous level measurement without any physical contact with the process material, making it ideal for corrosive, viscous, or hazardous environments.
Ultrasonic level sensors are widely used in various industries including water treatment, chemical processing, food & beverage, and oil & gas. They provide reliable and accurate readings for liquid level monitoring, inventory control, and overflow protection. Since they do not come in direct contact with the medium, they offer reduced maintenance, enhanced safety, and longer operational life.
In this guide, we cover everything about ultrasonic level sensors – including their working principle, key applications, proper installation techniques, and calibration procedures to ensure optimal performance. Whether you're an engineer, technician, or plant operator, understanding how ultrasonic level measurement works can help improve your process control and equipment safety.
What is an Ultrasonic Wave?
An ultrasonic wave is a type of acoustic wave that has a frequency higher than the upper audible limit of human hearing. Typically, humans can hear sound frequencies between 20 Hz and 20,000 Hz (20 kHz). Any sound wave with a frequency above 20 kHz is considered ultrasonic and cannot be heard by the average person.
Ultrasonic waves are mechanical vibrations that travel through a medium (such as air, liquid, or solid) in the form of pressure waves. These waves are commonly used in industrial applications for non-contact distance measurement, level sensing, object detection, thickness gauging, and even in medical imaging (ultrasound).
In the context of level sensors, ultrasonic technology is used to emit a burst of ultrasonic energy toward a surface. The sensor then measures the time it takes for the reflected wave (echo) to return, which is used to calculate the distance to the material surface accurately.
What is an Ultrasonic Level Sensor?
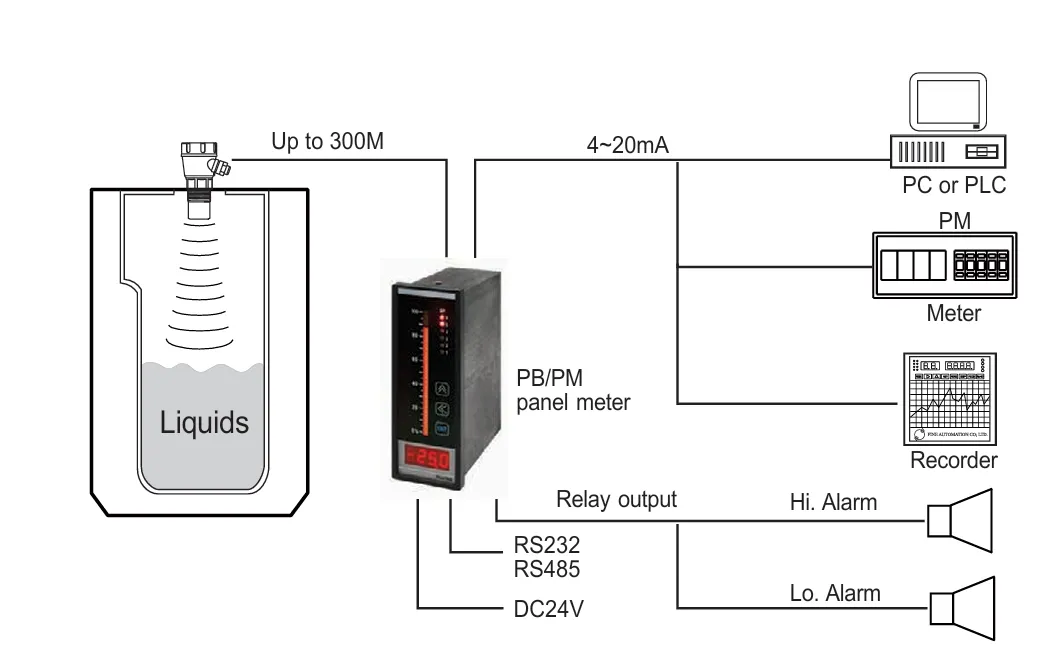
An ultrasonic level sensor is a non-contact device that uses high-frequency acoustic waves to measure the level of liquids, sludges, or solids in a tank or vessel. The sensor's transmitter emits ultrasonic pulses, typically in the frequency range of 30 kHz to 200 kHz, directed toward the surface of the material being measured.
When the ultrasonic waves hit the surface, they are reflected back to the sensor. The time delay between the emission and the reception of the echo is used to calculate the distance to the surface. This distance is then converted into a corresponding level reading, which can be output as an analog signal (e.g., 4–20 mA) or a digital communication signal depending on the transmitter design.
Ultrasonic level sensors are widely used in industrial applications for continuous level monitoring in tanks, open channels, and silos due to their reliability, ease of installation, and non-contact nature.
Principle of Ultrasonic Level Measurement
An ultrasonic level transmitter operates by emitting short bursts of high-frequency sound waves (ultrasonic pulses) in the direction of the material surface (liquid or solid). These pulses travel through the air and reflect off the surface of the product. The reflected signal, also known as an echo, returns to the sensor’s receiver.
The sensor electronics then measure the time (t) it takes for the pulse to travel to the surface and back. Using this time and the known speed of sound (v) in the air, the distance (D) from the sensor to the surface is calculated using the formula:
D = (v × t) / 2
Here, v is the speed of sound in the medium, which can vary depending on the air temperature and pressure. To maintain measurement accuracy, most ultrasonic sensors include a built-in temperature compensation function that adjusts the velocity based on real-time temperature data.
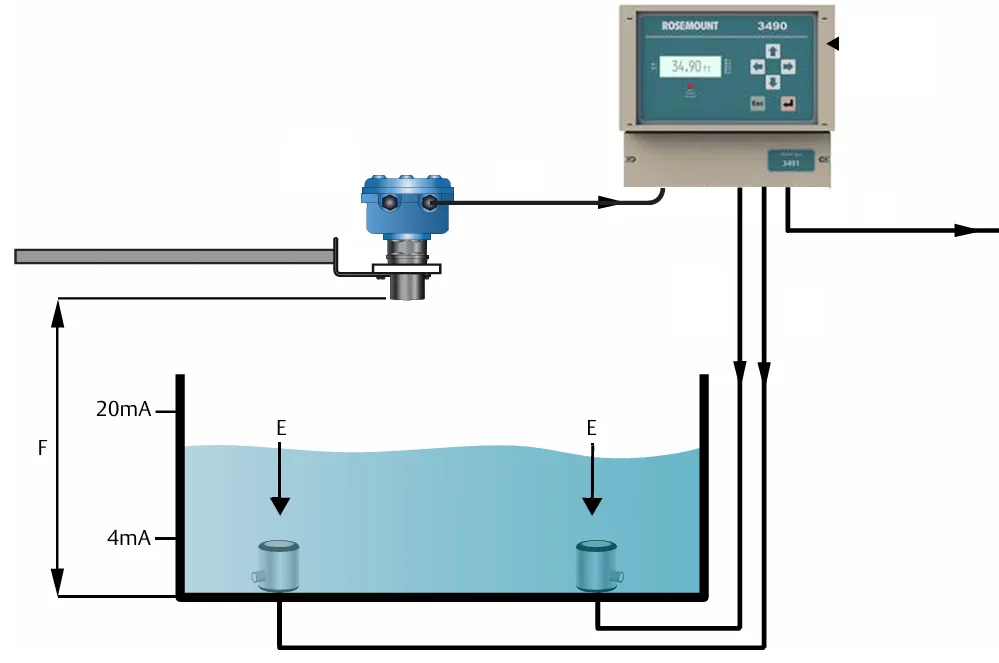
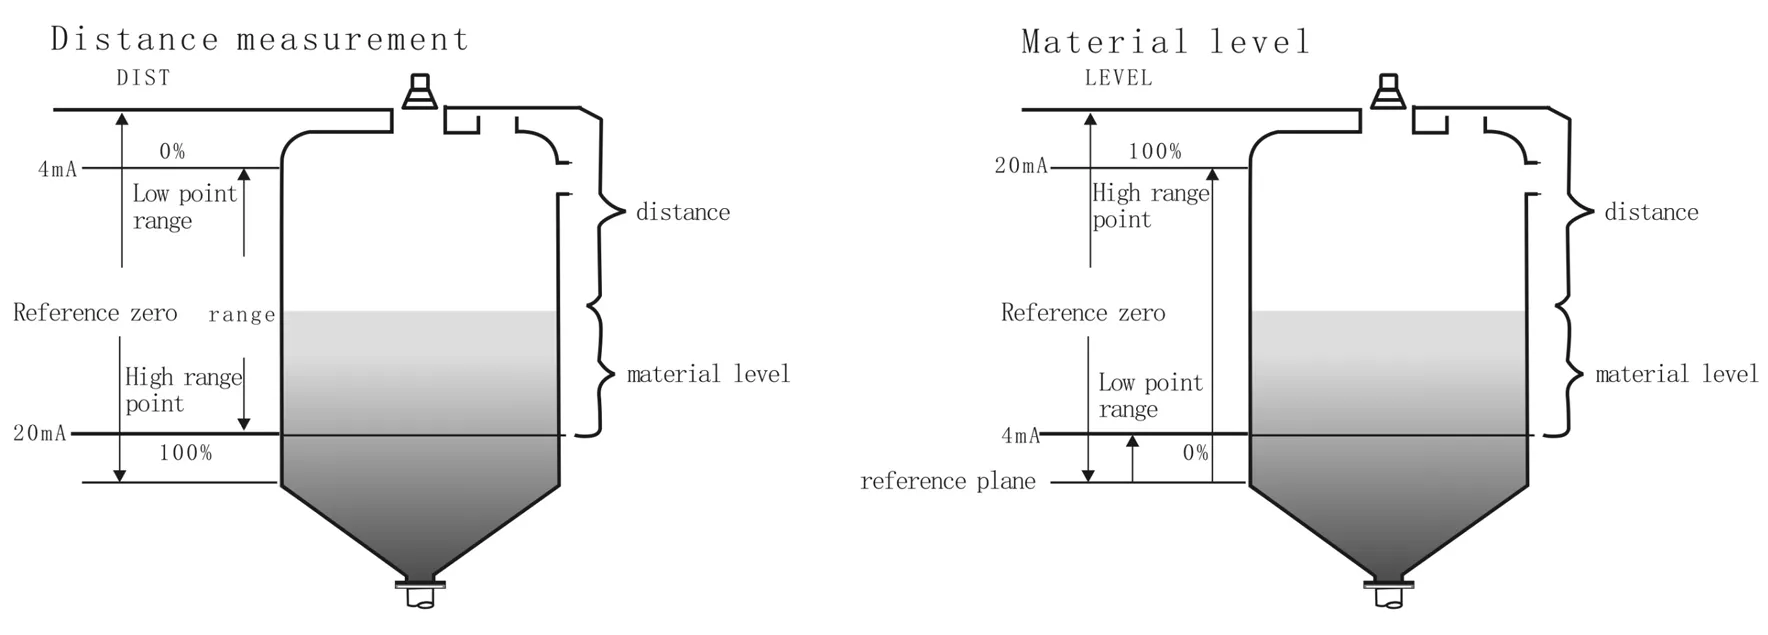
Once the distance D is known, and the user has configured the total empty tank height (E), the actual product level (L) is determined using the equation:
L = E – D
This calculated level can then be transmitted as an analog output (like 4–20 mA) or digital signal, and used for level monitoring, control, or alarming applications.
What is Blind Distance in Ultrasonic Level Sensors?
The blind distance (also called the dead zone) is the minimum distance between the sensor and the surface that it cannot accurately measure. Within this zone, the transmitted ultrasonic pulse and the reflected echo may overlap, making level calculation unreliable. Typically, the blind distance ranges from 10 cm to 50 cm depending on the sensor design. Accurate measurement only begins beyond this blind zone.
What is the Installation Height of an Ultrasonic Sensor?
The installation height of an ultrasonic level sensor refers to the vertical distance from the sensor’s mounting point (usually the tank or silo roof) down to the bottom of the tank or vessel. This value is used to define the total range the sensor may need to cover. When installing, it’s important to position the sensor perpendicular to the measured surface and high enough to account for the sensor’s blind distance while still seeing the full usable depth of the tank.
What is the Measuring Range of an Ultrasonic Level Sensor?
The measuring range is the span between the end of the blind distance and the maximum distance the sensor can effectively detect. For example, if a sensor has a total range of 5 meters and a blind zone of 0.3 meters, its effective measuring range is 0.3 m to 5 m. The sensor should be selected based on the tank height and expected material level variation to ensure the full range is covered.
What is Beam Angle (α) in Ultrasonic Level Sensors?
The beam angle, denoted by the Greek letter α, refers to the angular spread of the ultrasonic wave emitted by the sensor. It defines how wide the ultrasonic pulse expands as it travels toward the target surface. Beam angle is typically expressed in degrees (°).
A smaller α (narrow beam angle, e.g., 5° to 8°) results in a more focused signal, ideal for narrow tanks or environments with internal obstructions. A larger α (e.g., 10° to 15°) covers a broader area and may be suitable for open tanks with flat surfaces.
Proper alignment and understanding of the beam angle (α) help avoid measurement errors from false echoes, tank walls, or internal fittings.
How to Install an Ultrasonic Level Sensor?
Proper installation of an ultrasonic level sensor is crucial for accurate and stable measurement. Follow these best practices to ensure optimal sensor performance:
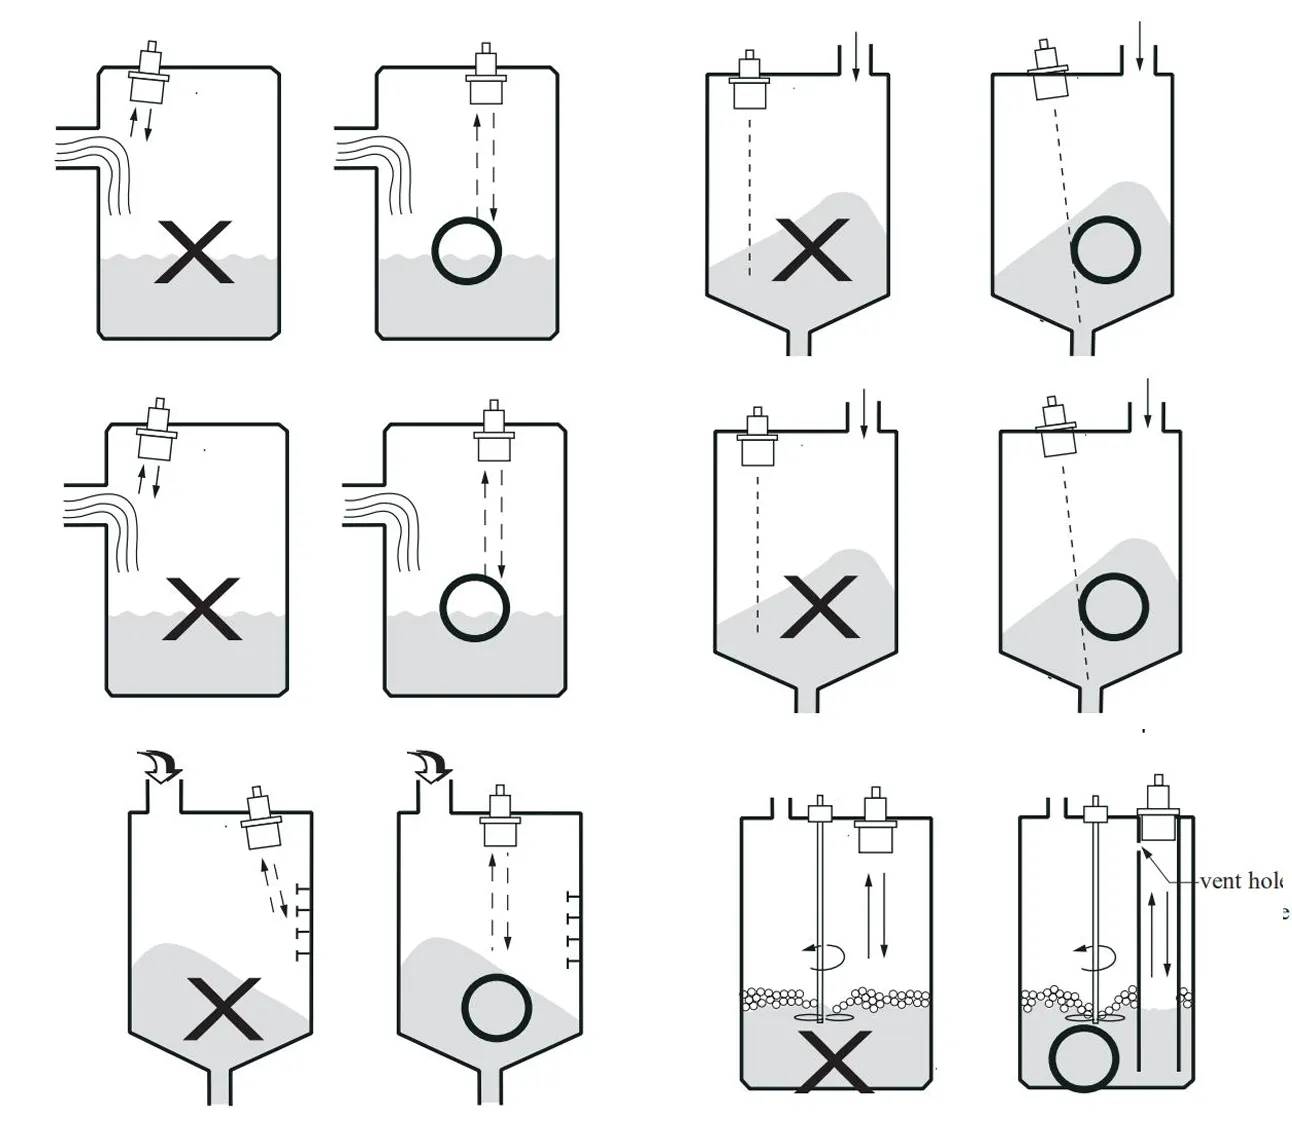
- Select a suitable mounting location: Choose a location free from obstructions such as internal ladders, mixers, or inflow streams. The sensor should have a clear and unobstructed path to the surface of the measured material.
- Mount the sensor vertically: Install the sensor so it faces directly downward (perpendicular to the surface). Tilting or angled mounting may cause reflection errors or weak echoes.
- Maintain minimum distance from blind zone: Ensure the distance from the sensor to the highest expected material level is greater than the sensor’s specified blind distance.
- Use proper mounting hardware: Use flanges, brackets, or threaded fittings recommended by the manufacturer. Avoid makeshift installations that may shift or vibrate.
- Allow space for beam spread: Consider the sensor’s beam angle (α). Avoid mounting too close to tank walls or other structures that may reflect the signal and create false echoes.
- Seal the installation (if necessary): For dusty, humid, or pressurized environments, ensure proper sealing and choose a sensor with an appropriate IP rating.
- Perform configuration and calibration: After installation, configure the sensor parameters like empty distance (E), 4–20 mA scaling, and damping time. Run a test to verify proper signal reflection and measurement accuracy.
Following these steps helps ensure your ultrasonic level sensor delivers reliable, maintenance-free, and long-term operation in industrial environments.
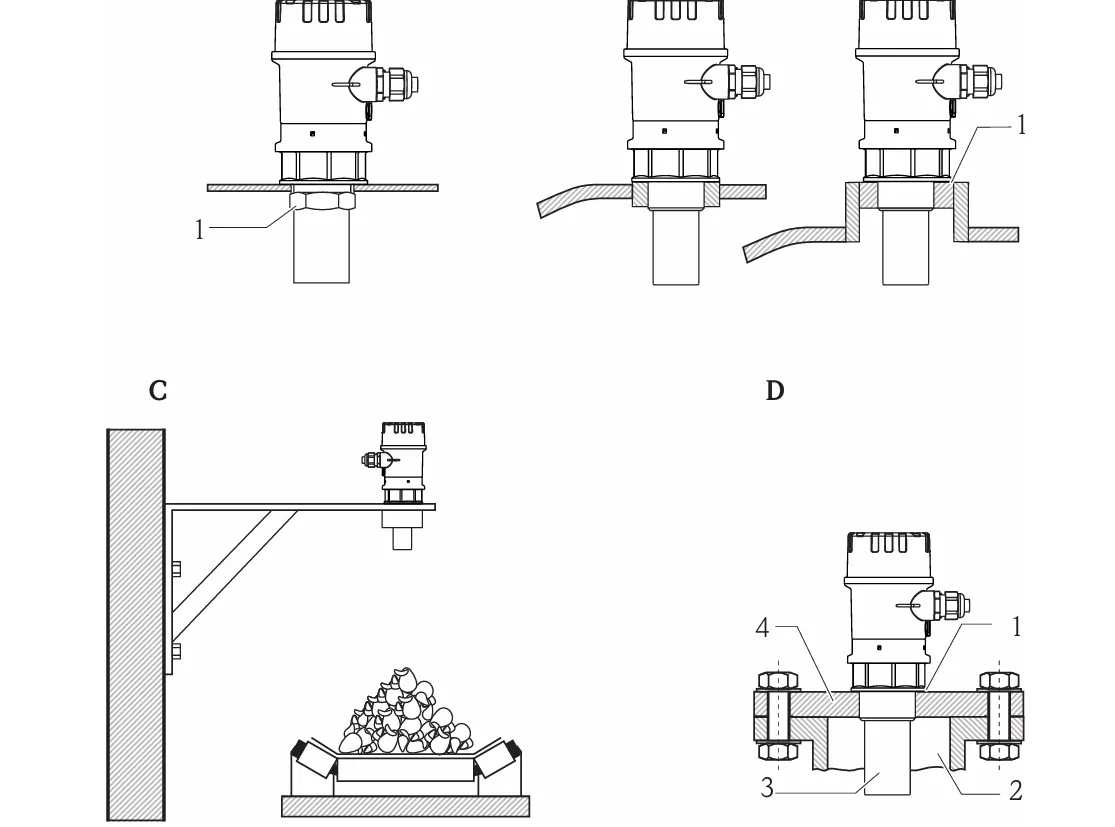
Types of Ultrasonic Level Sensor Installation
- Flat-Top Tank: Ideal for direct mounting. Install the sensor flush with the top surface, avoiding nozzles if possible.
- Arched Tank: Avoid the center. Mount at 1/2 to 2/3 radius to reduce false echoes from the dome shape.
- Open Tank: Use a strong mounting bracket. Keep distance from walls to avoid reflection errors.
- Drainage Wells: Use a nozzle or sleeve to stabilize readings. Account for increased blind zone (50%–100%).
- Open Channel: Mount over the flow path using a bracket, ensuring a clear view to the water surface.
- Solids (Silos/Bins): Mount at an angle to avoid material buildup and ensure consistent reflection.
- River or Pond: Use a bridge or fixed structure with a downward-facing bracket. Protect against flooding and wind.
What to Avoid When Installing an Ultrasonic Level Sensor
To ensure reliable and accurate performance, ultrasonic level sensors should not be installed in the following locations or conditions:
- Direct Sunlight or Near Heat Sources: Avoid installation where the sensor is exposed to direct sunlight or placed near hot equipment, which can affect sensor stability.
- High Ambient Temperature: Do not install in environments where the temperature exceeds 60°C during operation.
- High Humidity: Avoid locations where ambient humidity exceeds 85%, as it may affect internal electronics.
- Electromagnetic Interference: Keep the sensor away from strong electromagnetic sources such as motors, inverters, or high-power transmitters.
- Strong Mechanical Vibrations: Do not mount the sensor in areas subject to continuous or strong vibration that can affect signal stability.
- Frequent Temperature Fluctuations or Condensation: Avoid areas with high temperature changes that may cause condensation on the sensor surface, leading to false readings.
- Incorrect Mounting Height: Ensure the measured surface is always beyond the sensor’s blind zone. Mounting too close can result in inaccurate or no measurements.
What is the Output of an Ultrasonic Level Sensor?
An ultrasonic level sensor typically provides an output signal that corresponds to the measured distance or level of the material (liquid or solid) inside a tank or container. The most common output types include:
- 4–20 mA Analog Output: A current signal proportional to the measured distance or level. Commonly used for industrial control systems (e.g., PLCs, SCADA).
- 0–10 V Analog Output: A voltage signal used in some control applications.
- Relay or Switch Output: Provides ON/OFF control when the level crosses a defined threshold (used for alarms or pumps).
- Digital Output: Protocols like Modbus, HART, RS485, or IO-Link allow detailed communication with a controller or monitoring system.
The selected output type depends on the application, the connected device (such as a PLC), and whether continuous or point-level data is needed.
Troubleshooting Ultrasonic Level Sensors
Ultrasonic level sensors may experience performance issues due to environmental conditions, incorrect installation, or signal interference. Below are common problems and solutions:
- No Output Signal:
✔ Check power supply and wiring connections.
✔ Ensure output signal type matches receiver (e.g., 4–20 mA or Modbus). - Fluctuating or Unstable Readings:
✔ Avoid mounting near agitators, inflows, or surfaces causing turbulence.
✔ Use stilling wells or damping if surface is very agitated. - Sensor Reads Maximum Distance (Out of Range):
✔ Check for blockage or incorrect orientation.
✔ Make sure the material surface is within range and outside the blind zone. - False Echoes or Ghost Signals:
✔ Avoid installation near tank center (for dome-shaped tops).
✔ Enable false echo suppression or use acoustic foam dampers. - Condensation or Dirt on Sensor Face:
✔ Clean the sensor regularly.
✔ Install in environments with controlled temperature and humidity. - Communication Error (Digital Output):
✔ Check baud rate, parity, and address settings.
✔ Verify proper grounding and shielded cables.
Always refer to the manufacturer's manual for specific diagnostics and configuration software support.
Calibration of Ultrasonic Level Sensor – Step-by-Step Guide
Proper calibration ensures that an ultrasonic level sensor delivers accurate distance or level readings. Calibration may be done using onboard keys, remote display, or configuration software.
Typical Calibration Steps:
- Step 1 – Power On: Ensure the sensor is correctly wired and powered up.
- Step 2 – Set the Empty Distance (Zero Calibration):
Measure and input the distance from the sensor to the bottom of the tank (empty level). - Step 3 – Set the Full Level (Span Calibration):
Enter the level when the tank is full (usually distance = sensor height – full level height). - Step 4 – Configure Output Range:
Set the analog output range (e.g., 4 mA = empty, 20 mA = full). - Step 5 – Save and Test:
Save calibration settings. Fill the tank partially and verify correct sensor reading on HMI or transmitter display. - Step 6 – Fine-Tuning (if required):
Adjust damping or sensitivity settings to reduce fluctuations or false echoes.
Note: For digital models (HART, Modbus), calibration may also be done using handheld configurators or PC software.
Applications of Ultrasonic Level Sensors
Ultrasonic level sensors are widely used in non-contact level measurement applications across various industries due to their simplicity, safety, and reliability.
Common Applications:
- Water Treatment Plants: Measuring levels in reservoirs, clarifiers, and chemical tanks.
- Sewage and Drainage Monitoring: Level measurement in lift stations, wells, and stormwater drains.
- Food and Beverage Industry: Non-contact level sensing in hygienic tanks to avoid contamination.
- Chemical Industry: Monitoring corrosive or hazardous liquids where contact is not preferred.
- Open Channels and Rivers: Used for flow monitoring by measuring water level over weirs or flumes.
- Solids and Powders: Monitoring grain, cement, and plastic pellets in silos.
- Oil and Fuel Storage: Non-intrusive level detection in diesel tanks and oil reservoirs.