RSLogix 5000 Limit (LIM) Instruction – Complete Guide
Published on Aug 08, 2025 | Category: limitShare this Page:
The Limit (LIM) instruction in RSLogix 5000 is used to check if a value is within a defined range. It compares a test value with a Low Limit and a High Limit, and the instruction is true only when the value stays inside that range.
This makes it very useful in PLC programming for keeping processes within safe or expected operating limits.
For example, if a temperature input needs to stay between 50°C and 100°C,
the LIM instruction will turn ON the output when the temperature is inside this range.
If the temperature goes below 50 or above 100, the instruction will be false.
This simple logic helps in real applications like temperature control, pressure checks, tank level monitoring, and speed control.
What is the Limit (LIM) Instruction in RSLogix 5000?
The Limit (LIM) instruction in RSLogix 5000 is a comparison instruction that checks if a value is within a specific range. It uses three parameters: a Low Limit, a Test Value, and a High Limit. The instruction turns TRUE when the test value is greater than or equal to the low limit and less than or equal to the high limit.
In simple words, the LIM instruction answers the question: “Is my value between these two limits?” If yes, the logic goes true; if not, it goes false. This makes it very useful for controlling processes within safe boundaries without writing multiple comparison instructions.
Operands of the Limit (LIM) Instruction in RSLogix 5000
The Limit (LIM) instruction works with three key operands: Low Limit, Test, and High Limit. Together, they decide if the test value lies inside or outside the defined range.
1. Low Limit
The Low Limit is the minimum value of the range. It sets the lower boundary against which the test value is compared. If the test value is less than this number, the LIM instruction will be FALSE. For example, in a temperature range of 50°C to 100°C, the Low Limit is 50.
2. Test
The Test is the actual value being monitored. It can be a tag, a process variable, or an immediate constant value. The instruction checks whether this test value is between the low and high limits. For example, if the current temperature sensor reading is 72°C, that value is the Test.
3. High Limit
The High Limit is the maximum value of the range. It sets the upper boundary. If the test value is greater than this number, the LIM instruction becomes FALSE. In our example of 50°C to 100°C, the High Limit is 100.
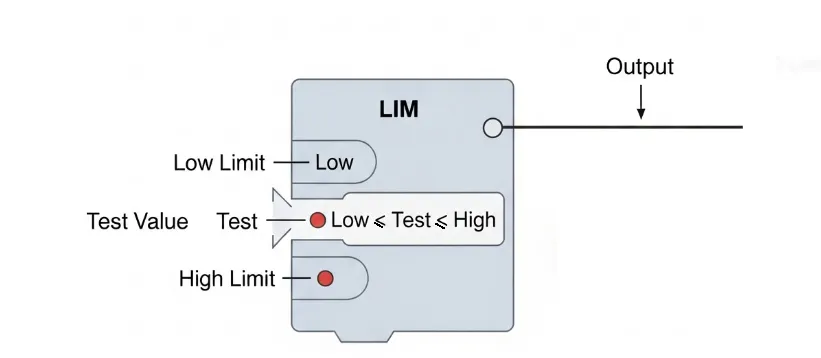
In summary, the LIM instruction is TRUE only when:
Low Limit ≤ Test ≤ High Limit
Example of Limit (LIM) Instruction in RSLogix 5000
Let’s say you want to monitor the temperature of a process and allow the heater to run only when the temperature is within a safe range of 50°C to 100°C. For this, you can use the LIM instruction.
Setup
- Low Limit: 50
- Test: Temp_Sensor (current process value in °C)
- High Limit: 100
Logic Explanation
When the temperature reading (Temp_Sensor) is greater than or equal to 50 and less than or equal to 100, the LIM instruction becomes TRUE. In this condition, the output Heater_OK can be turned ON.
If the temperature goes below 50 or rises above 100, the LIM instruction becomes FALSE, and the heater is stopped or an alarm can be triggered for safety.
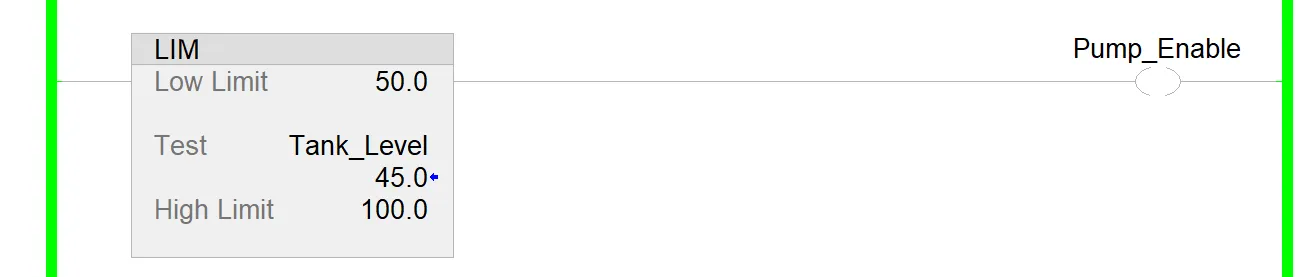
In this example, the LIM block checks the value of Temp_Sensor against the limits (50 and 100). The output Heater_OK is energized only when the test value is within the specified range.

Tank Level Example using LIM Instruction
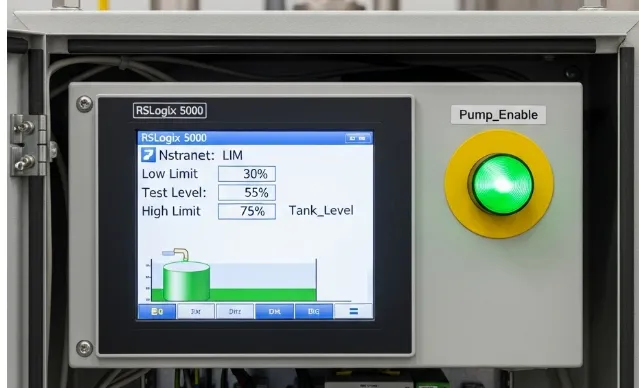
Another common use of the LIM instruction is in tank level monitoring. Suppose you only want to start a transfer pump when the tank level is between 30% and 75%. Outside of this range, the pump should remain OFF for safety.
Setup
- Low Limit: 30
- Test: Tank_Level (current level in %)
- High Limit: 75
Logic Explanation
The instruction checks if Tank_Level is greater than or equal to 30 and less than or equal to 75. When this condition is true, the output Pump_Enable turns ON, allowing the transfer pump to run. If the tank level goes below 30% (too low) or above 75% (too high), the LIM instruction goes FALSE and the pump is turned OFF.
This ensures the pump only operates within the safe working range of the tank, preventing dry running at low levels or overflow at high levels.