Understanding Array Data Types in Schneider PLC EcoStruxure Control Expert
Published on Sep 05, 2025 | Category: Array Data TypeShare this Page:
Arrays in Schneider PLC EcoStruxure Control Expert let you store multiple values under one name, making programs cleaner and easier to manage. In this guide, you’ll learn how to declare arrays in Structured Text, access individual elements, use FOR loops to manipulate array data, and work with multi-dimensional arrays. Practical examples, common mistakes, and best practices are included to help both beginners and engineers understand arrays easily.
What is Array Data Type?
An Array Data Type in Schneider PLC EcoStruxure Control Expert is a data item that contains a set of data elements of the same type. Arrays allow you to group multiple related values under a single name, making programming cleaner and easier to manage.
Arrays can store:
- Elementary Data (EDT): Basic data types like BOOL, UINT, INT, REAL, etc.
Example: a group of BOOL words or a group of UINT integer words. - Derived Data (DDT): Complex data types created by combining multiple elementary or derived data types.
An array in Schneider PLC EcoStruxure Control Expert is characterized by two main parameters:
- Organization (Array Dimensions): Defines how the array is structured, such as the number of elements and dimensions.
- Data Type: Defines the type of data the array stores, for example BOOL, UINT, INT, REAL, or even derived data types (DDT).
Note: The most complex array can have up to 15 dimensions, and its total size cannot exceed 65,535 bytes.
The general syntax for declaring an array combines these two parameters:
ARRAY [lower_bound..upper_bound] OF data_type;
Dimensions of an Array
The dimension of an array defines how many indices are required to access each element. Each dimension adds a level of complexity to the array structure.
Here are some examples of arrays with different dimensions:
- 1-Dimensional Array: A simple list of elements that can be accessed with a single index.
Example: SensorStatus: ARRAY[1..5] OF BOOL;
This is a 1-dimensional array with 5 Boolean elements. - 1-Dimensional Array with Negative Index: An array that allows custom indexing.
Example: PressureValues: ARRAY[-5..5] OF REAL;
This 1-dimensional array has 11 REAL elements, indexed from -5 to 5. - 2-Dimensional Array: Can be visualized as a table with rows and columns.
Example: TemperatureGrid: ARRAY[1..4, 1..6] OF INT;
This 2-dimensional array has 4 rows and 6 columns of integers (total 24 elements). - 3-Dimensional Array: A cube-like structure, often used for storing data over multiple layers.
Example: MotorSpeeds: ARRAY[0..2, 1..3, 1..5] OF REAL;
This 3-dimensional array has 3x3x5 = 45 REAL elements.
💡 Note: Schneider PLC arrays can go up to 15 dimensions, but managing very high-dimensional arrays can become complex and memory-intensive.
How to Create Array Data Type in Schneider PLC using EcoStruxure Control Expert
Arrays are an essential part of PLC programming because they allow you to store multiple values under a single name. In Schneider PLC EcoStruxure Control Expert, you can create both single-dimensional and multi-dimensional arrays in the Variable Table.
Follow these steps to create an array:
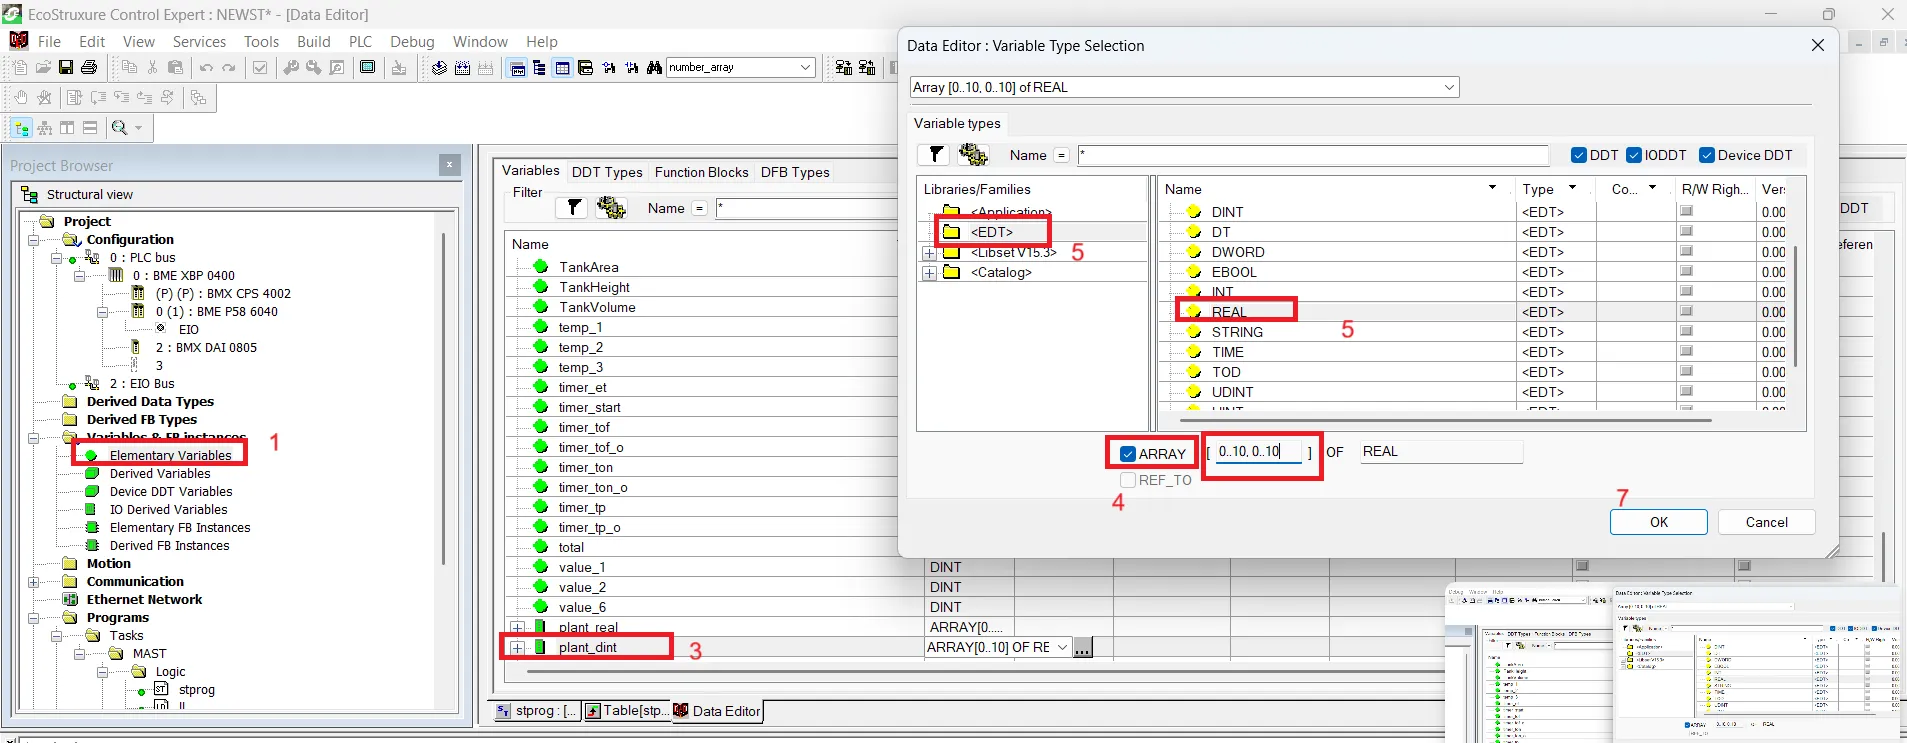
- Step 1: Open the Variable Table
Start by opening your project and navigating to the Elementary Variable Table (EDT) where you can add variables. - Step 2: Add a New Variable
Click Add to create a new variable. Give your array a meaningful name, for example: Plant_BOOL, Plant_REAL, or Machine_DINT.- Plant_BOOL will store all Boolean values.
- Plant_REAL will store real numbers.
- Machine_DINT will store integer values.
- Step 3: Select Array Type
In the variable properties, press the type field to open the Data Editor window. Choose Array as the variable type. - Step 4: Define Array Dimensions
By default, a single-dimensional array shows 0..1 (0 is the start index, 1 is the end index). This creates an array with 2 elements. You can modify the end index based on your needs. For example, 0..10 will create an array that can store 11 values. - Step 5: Select Data Type
From the libraries/family, select the data type. For an EDT (Elementary Data Type) array, choose types like BOOL, REAL, or DINT. - Step 6: Create Multi-Dimensional Arrays
For more than one dimension, enter additional dimensions separated by commas.- Example: 0..2,0..3 creates a 2-dimensional array with 3x4 = 12 elements.
- You can add up to 15 dimensions if needed. Each dimension is separated by a comma.
- Step 7: Save the Variable
After defining the dimensions and selecting the data type, save the variable. Your array is now ready to be used in Structured Text or other PLC programs.
💡 Tip: Always choose meaningful names for arrays and dimensions to make your program easier to read and maintain. Single-dimensional arrays are great for simple lists, while multi-dimensional arrays are ideal for tables, matrices, or structured data.
Schneider PLC Array Example in ladder lanaguage
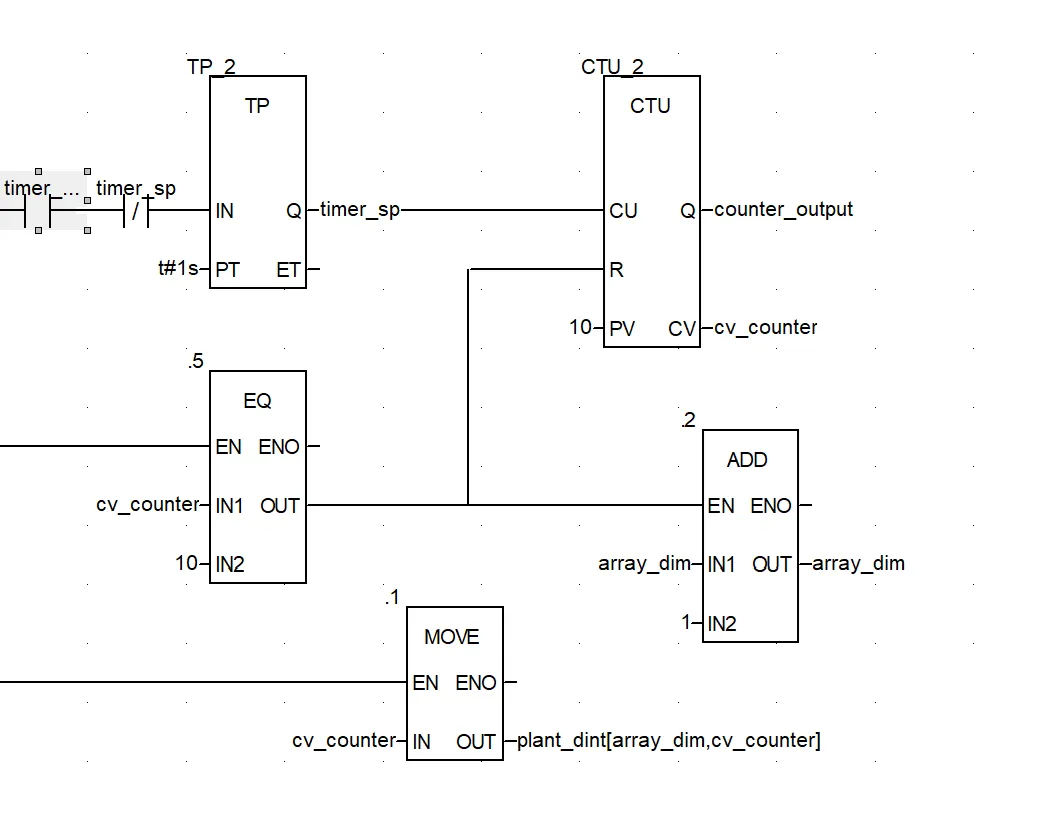
This example demonstrates how to fill a 2-dimensional integer array named plant_dint using a timer-driven counter in Schneider PLC. The counter increments from 0 to 10, stores each value sequentially in the array, and resets after reaching the maximum. The row index is incremented to fill the next row automatically.Overview of the Program
in first we have a pulse timer The TP timer produces a pulse at fixed intervals (1 second). This pulse drives the CTU counter, ensuring it increments regularly.
a counterThe CTU counter increments the variable cv_counter every time it receives a pulse from the timer. It counts from 0 up to a preset value of 10. The current value is used to populate one column in the current row of the array.
- CTU Counter: Counts up with each timer pulse.
- TP Timer: Generates a pulse every 1 second to trigger the counter.
- MOVE Block: Stores the current counter value into the correct array element.
- EQ Block: Compares the counter with the preset maximum and triggers a reset.
- ADD Block: Increments the row index to move to the next row.
 for counter
- CU: Input triggered by the timer pulse.
- R: Resets the counter when EQ triggers.
- PV: Maximum count value (10).
- CV: Current counter value.
Step 2: Pulse Timer (TP)
- IN: Timer trigger input.
- PT: Timer duration (e.g., 1 second).
- Q: Output pulse used to increment the counter.
Step 3:MOVE Block
The MOVE block transfers the current counter value into the correct array element plant_dint[array_dim, cv_counter]. This stores the value in the proper row and column sequentially.
- Example: If cv_counter = 3 and array_dim = 0, then plant_dint[0, 3] = 3.
Step 4: EQ Block
The EQ block compares the counter value with the preset maximum (10). When the values are equal, it triggers the counter reset so the next row can start from 0.
Step 5: ADD Block
The ADD block increments array_dim by 1 after the counter completes a full row. This moves the logic to the next row of the 2D array.
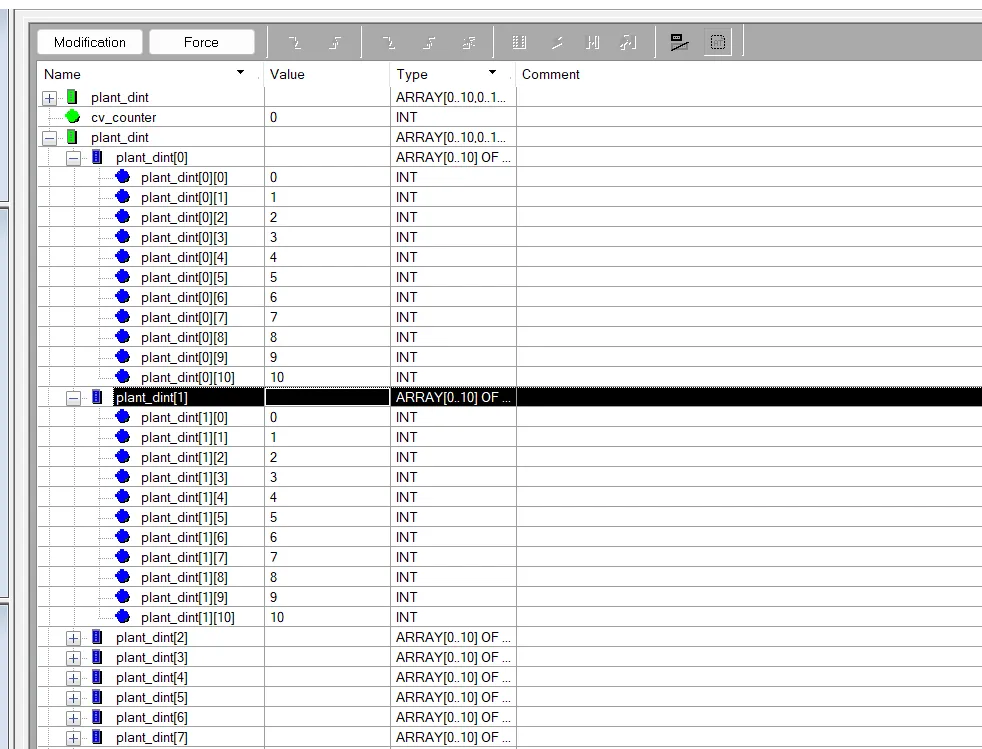
Step 6: Filling the 2D Array
The program fills the array row by row as follows:
- Row 0: 0, 1, 2, 3, ..., 10
- Row 1: 0, 1, 2, 3, ..., 10
- Row 2: continues similarly for subsequent rows
The timer triggers the counter, MOVE stores the value, EQ resets the counter, and ADD increments the row automatically.
Summary
- The timer ensures regular counter increments.
- The counter provides sequential values for the array.
- MOVE block stores values in the correct array positions.
- EQ block resets the counter when the maximum is reached.
- ADD block increments the row index for the next row.
- This structured logic efficiently populates the 2D array.
Schneider PLC Array Example in Structured Text
This example demonstrates how to fill arrays in Schneider PLC using Structured Text and FOR loops. Two types of arrays are shown: a single-dimensional real array and a two-dimensional integer array. FOR loops allow efficient and systematic initialization of array elements, which is useful in PLC programming for storing sequences, calibration data, or process values.

Single-Dimensional Real Array Example
this example, a single-dimensional array named plant_real is filled with real numbers converted from integers using the INT_TO_REAL function. A FOR loop iterates from 0 to 9, assigning each loop index as a real value to the corresponding array element. This ensures that the array is populated sequentially, with plant_real[0] = 0.0, plant_real[1] = 1.0, and so on up to plant_real[9] = 9.0. Using this approach reduces repetitive code and makes it easy to modify the array size if needed.
Two-Dimensional Integer Array Example
This example demonstrates how to fill a two-dimensional integer array named plant_dint using nested FOR loops. The array has 5 rows and 11 columns. The outer loop iterates through each row, while the inner loop iterates through each column. Each element is assigned the column index value, so every row contains values from 0 to 10. This method fills the 2D array systematically, allowing each row and column to be initialized efficiently. The use of nested loops ensures that the array is structured and ready for further processing, such as timers, counters, or other PLC logic.