Create a Simple Project in Schneider EcoStruxure Machine Expert
Published on Sep 15, 2025 | Category: introductionShare this Page:
SCADA,stands for Supervisory Control and Data Acquisition, is basically the backbone of modern industrial automation. Think of it as a central control system that lets you keep an eye on all your machines, processes, and equipment in real-time. It collects data from PLCs, sensors, and other devices, so you can see what’s happening, catch problems before they get serious, and make sure everything runs smoothly. From factories to power plants, SCADA makes sure operations are efficient, safe, and under control.Schneider EcoStruxure Machine Expert takes this a step further by giving engineers and technicians a smart, easy-to-use platform to design and manage automation projects. It works hand-in-hand with PLCs, HMI/SCADA systems, drives, and other industrial devices.
In this guide, we’re going to walk you through creating a simple project in Schneider EcoStruxure Machine Expert, step by step. You’ll learn how to open the software, set up a new project, add controllers and devices, define variables, build program blocks, and write logic. We’ll also cover compiling your project, downloading it to a PLC, monitoring and debugging it in real-time, and finally running it in runtime mode.By the end of this tutorial, you’ll have practical experience with PLC programming, SCADA integration, and real-time automation.
How to Open Schneider EcoStruxure Machine SCADA Expert
EcoStruxure Machine SCADA Expert is Schneider Electric’s advanced software for designing HMI, SCADA, OEE, and dashboard applications. To start creating or monitoring your industrial projects, you need to launch the software properly from your computer.
Step-by-Step Guide:
- Click on the Start Menu on your Windows desktop.
- In the search bar, type EcoStruxure Machine SCADA Expert or scroll through the programs list.
- Select EcoStruxure Machine SCADA Expert from the search results or program list.
- The software will launch, opening the main workspace where you can create new projects, open existing ones, or configure system settings.
- Once opened, you can start designing screens, configuring tags, setting alarms, or integrating devices as needed.
Create a New Project in EcoStruxure Machine SCADA Expert
Once you have opened EcoStruxure Machine SCADA Expert, you can start a new project to design HMI screens, SCADA dashboards, or OEE monitoring solutions. A project serves as a container for all your screens, tags, alarms, trends, and configurations.
Step-by-Step Guide:
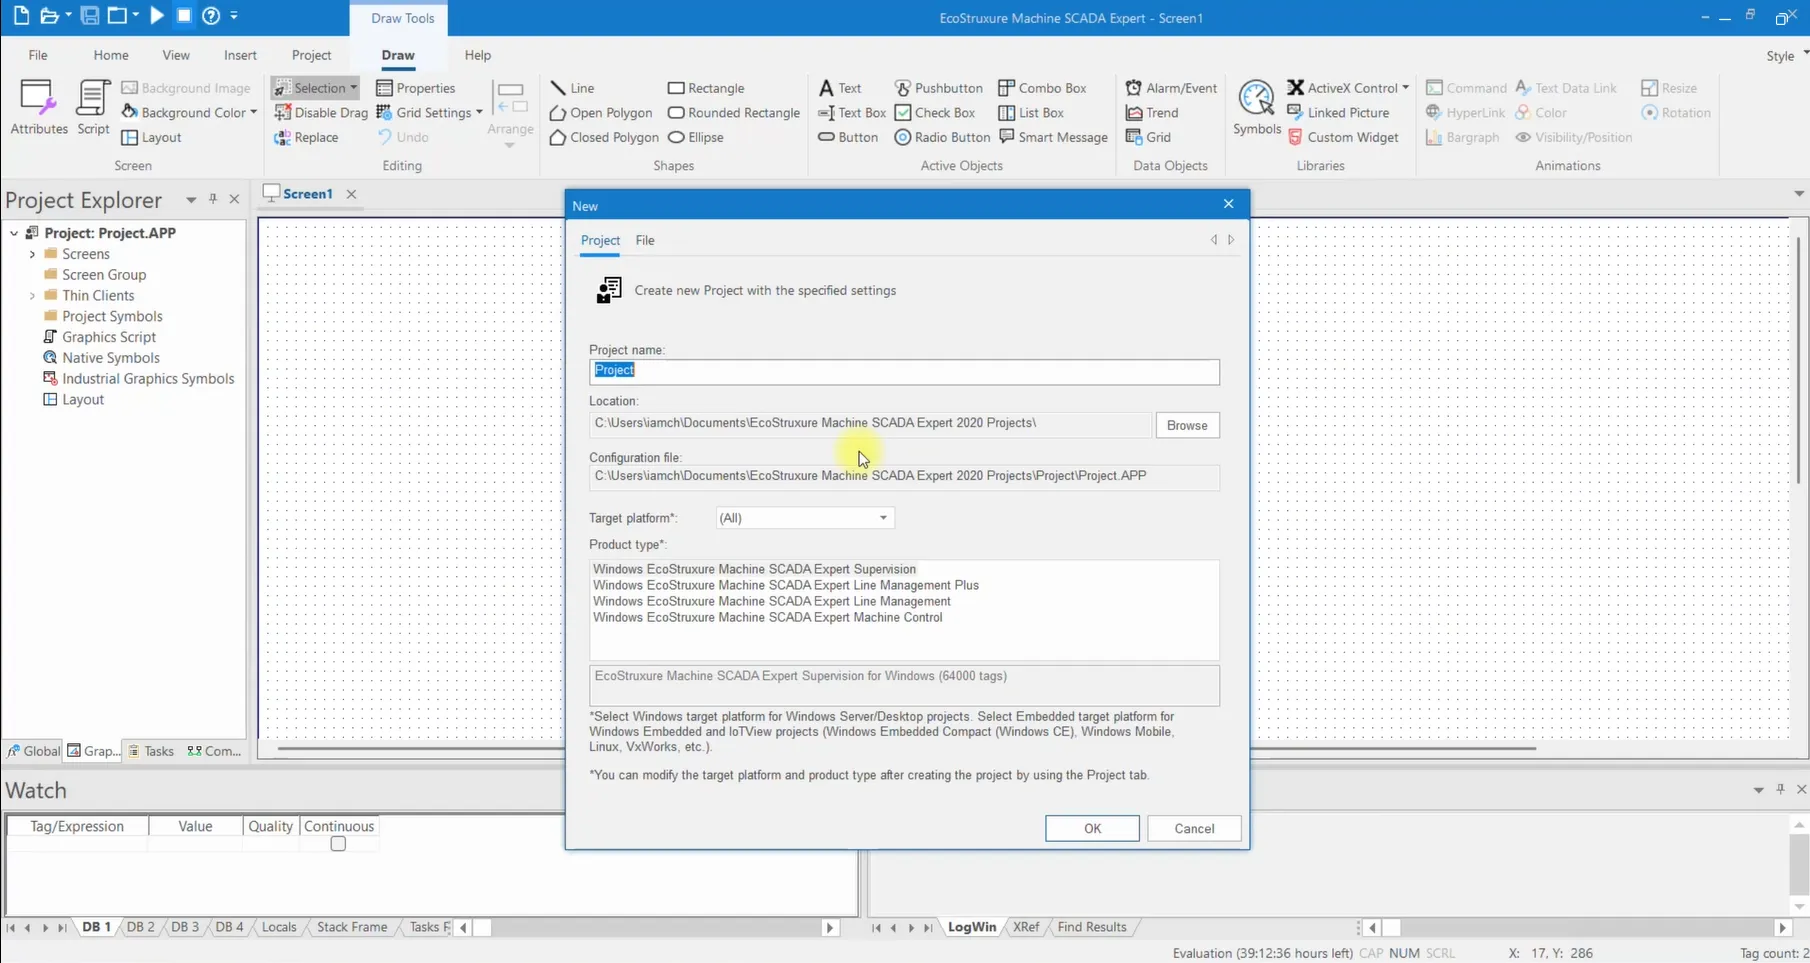
- Go to the File menu in the top-left corner of the software interface.
- Select New Project from the dropdown menu.
- In the dialog box that appears, enter a name for your project. Choose a meaningful name that describes the project or machine line.
- Press OK to create the project. The workspace will now be ready for you to add screens, configure tags, and set up your SCADA system.
Configure Project Settings in EcoStruxure Machine SCADA Expert
After creating a new project in EcoStruxure Machine SCADA Expert, it is important to configure the project settings. These settings allow you to define the project screen size, SCADA security parameters, user groups, local and domain settings, and passwords. For learning or initial setup purposes, you can simply review the options and proceed without making changes.
Step-by-Step Guide:
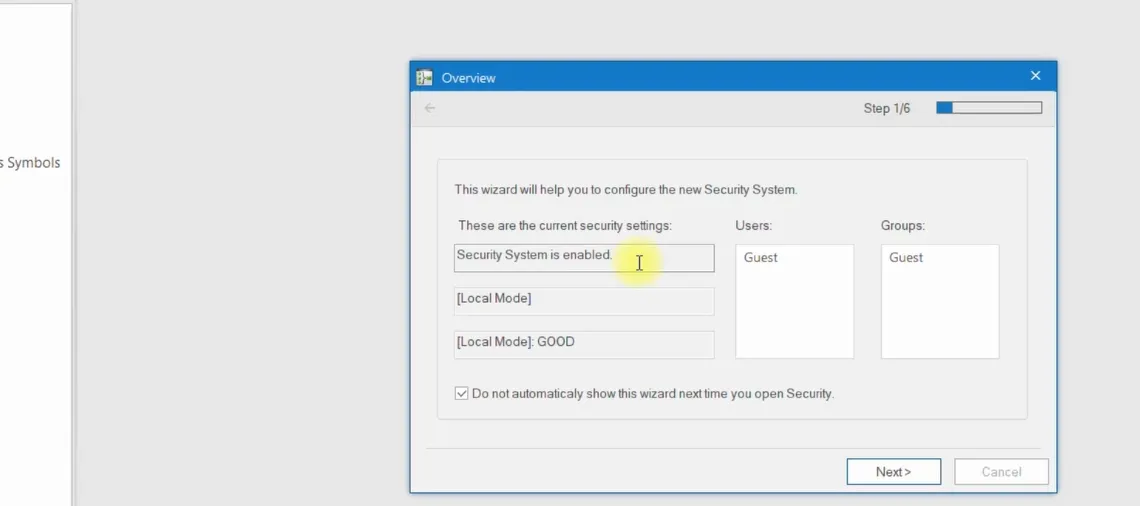
- After creating the project, the Project Settings Wizard will open automatically.
- Step 1: Review the Screen Size settings for your HMI or SCADA displays. Leave default if unsure and click Next.
- Step 2: Check the Security Settings, including user groups and permissions. For learning purposes, you can skip changes and click Next.
- Step 3: Configure local and domain user settings if required. For practice, leave default and click Next.
- Step 4: If prompted, you may set a password for the administrator or groups. For training, leave it blank and click Next.
- Step 5: Review any additional optional settings and click Next without making changes.
- Step 6: Final step, confirm all settings and click Finish to complete the project setup.
Once finished, your project is ready for screen creation, tag configuration, and SCADA system setup.
Add a Screen to Your Project in EcoStruxure Machine SCADA Expert
Once your project is created and configured, the next step is to add screens where operators can monitor and control machines. Screens serve as the visual interface for your SCADA project, allowing you to display real-time data, alarms, trends, and interactive controls.
Step-by-Step Guide:
- In the Project Tree panel, locate the Screens section of your project.
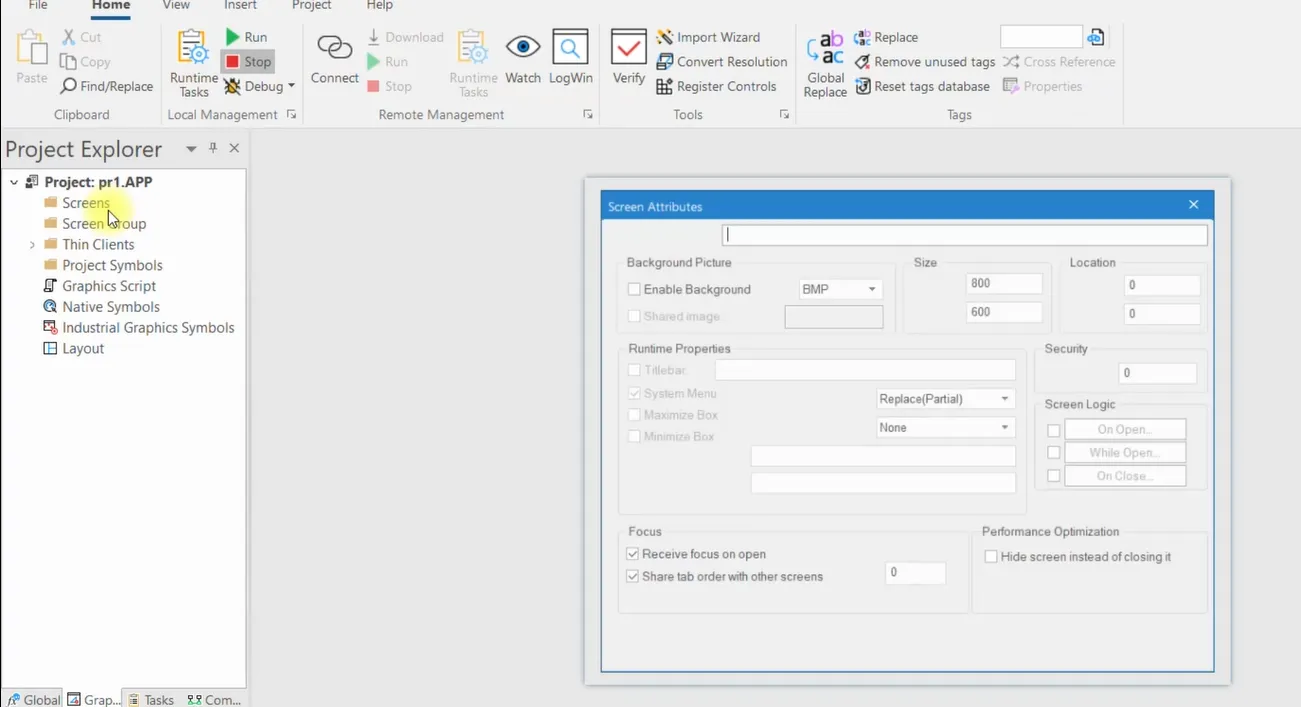
- Right-click on Screens and select Insert to add a new screen.
- The Screen Settings dialog will appear.
- Set the Background Color for your screen to match your project theme.
- Enter a Screen Name and add descriptive text if needed.
- Customize the screen layout by adjusting the Size, adding pictures, or changing background images.
- Apply additional customization options such as font, colors, or decorative elements to enhance visibility and operator experience.
- Click OK to save the screen settings. The screen will now appear in your project tree and can be further edited.
Adding and customizing screens is a key step in designing a user-friendly and effective SCADA system. Each screen can be tailored to show the exact data and controls required for your application.
Add Components to a Screen in EcoStruxure Machine SCADA Expert
After creating a screen, you can add interactive components such as text boxes, buttons, and indicators. These components allow operators to interact with the SCADA system, view real-time data, and control machines.
Step-by-Step Guide:
- Open the screen you want to modify from the Project Tree.
- Go to the Components Palette or toolbar where all available objects are listed.
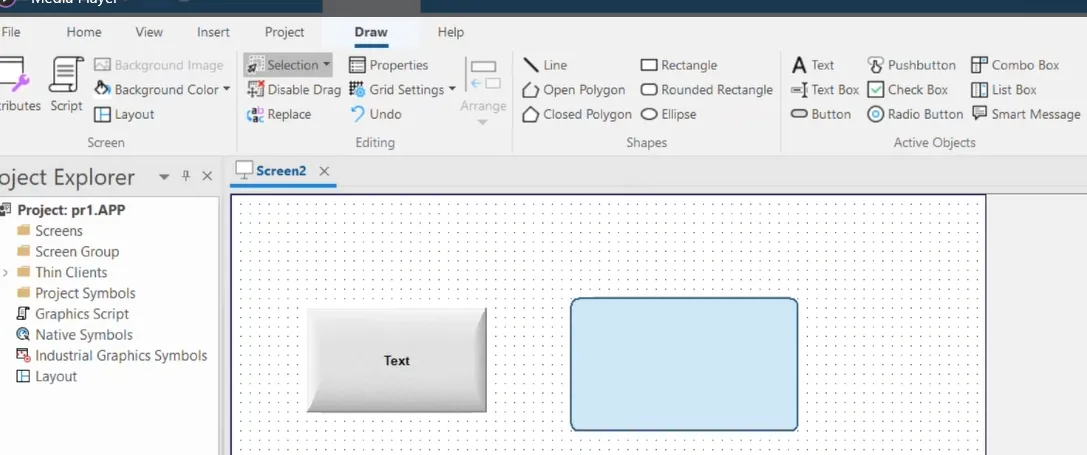
- To add a Text Box, select the Text Box tool and click on the screen where you want it placed. Enter the desired text or link it to a SCADA tag for dynamic display.
- To add a Button, select the Button tool and place it on the screen. Configure the button action, such as triggering a command, changing a tag value, or navigating to another screen.
- Resize and reposition the components as needed to create a clear and user-friendly interface.
- Use properties to customize fonts, colors, and styles for better visibility and operator experience.
Adding components like text boxes and buttons makes your SCADA screens interactive and functional, helping operators monitor and control processes efficiently.
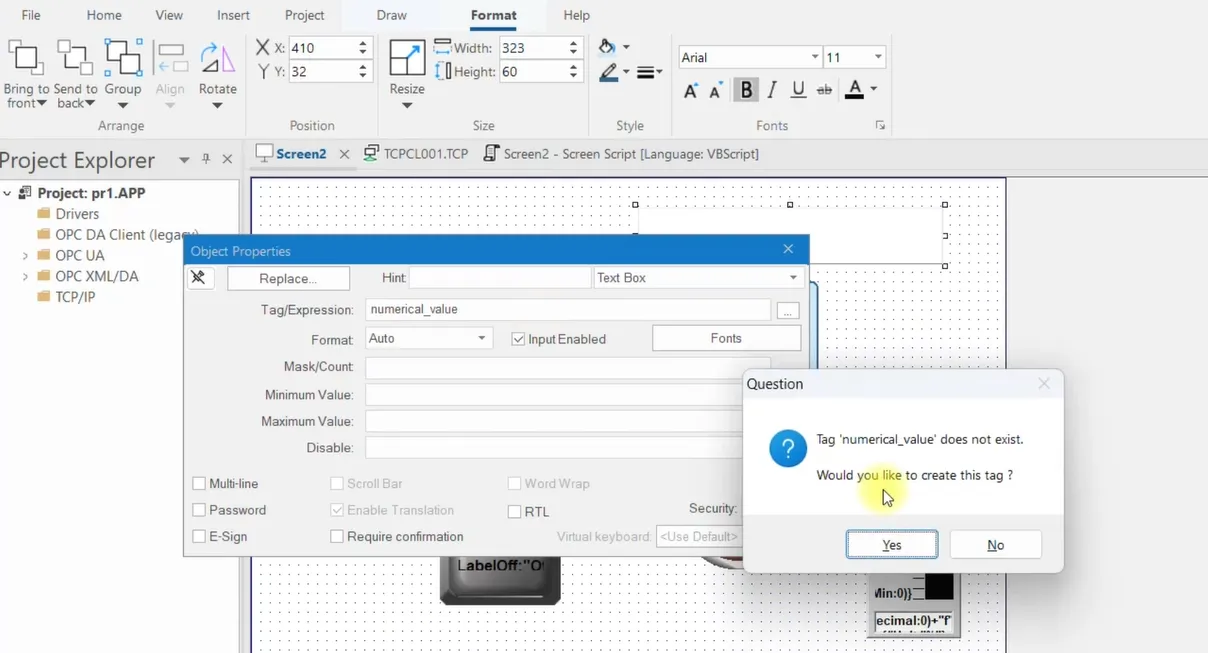
Change Properties of a Component in EcoStruxure Machine SCADA Expert
After adding components like buttons, text boxes, or symbols to your screen, you can customize their appearance and functionality using the Properties panel. This allows you to link components to SCADA tags, adjust colors, and change fonts to improve usability and visibility.
Step-by-Step Guide:
- Open the screen containing the component you want to modify.
- Double-click on the component or right-click it and select Properties from the context menu.
- In the Properties panel, you can modify several settings:
- Tag: Link the component to a SCADA tag for real-time data display or control.
- Expression: Add formulas or expressions if supported to dynamically change values.
- Color & Background Color: Set the foreground and background colors of the component.
- Line: Customize borders or outline styles if available.
- Font & Font Color: Choose font type, size, and color for text elements.
- After adjusting properties, close the panel or click Apply to save the changes.
Using the Properties panel, you can make your SCADA components more interactive, visually appealing, and connected to live data, enhancing the operator experience.
Add Symbols to a Screen in EcoStruxure Machine SCADA Expert
Symbols are pre-defined graphical elements that represent industrial equipment like tanks, motors, pumps, lights, and other machinery on your SCADA screens. Using symbols makes the interface visually clear and easy for operators to understand the process flow.
Step-by-Step Guide:
- Open the screen you want to edit from the Project Tree.
- Go to the Draw Menu or toolbar in the screen editor.
- Select the Symbol Tool to add a new symbol to your screen.
- To use a pre-defined symbol, click on System Symbol to open the Symbol Library.
- Browse through the library and choose the symbol that matches your equipment (e.g., tank, motor, pump, conveyor, or light).
- Click on the screen to place the selected symbol and adjust its size and position as needed.
- Repeat the process to add multiple symbols, ensuring each component matches your project layout.
Adding symbols enhances your SCADA screens, making them intuitive and visually representative of the actual industrial process, which helps operators quickly identify system status and alarms.

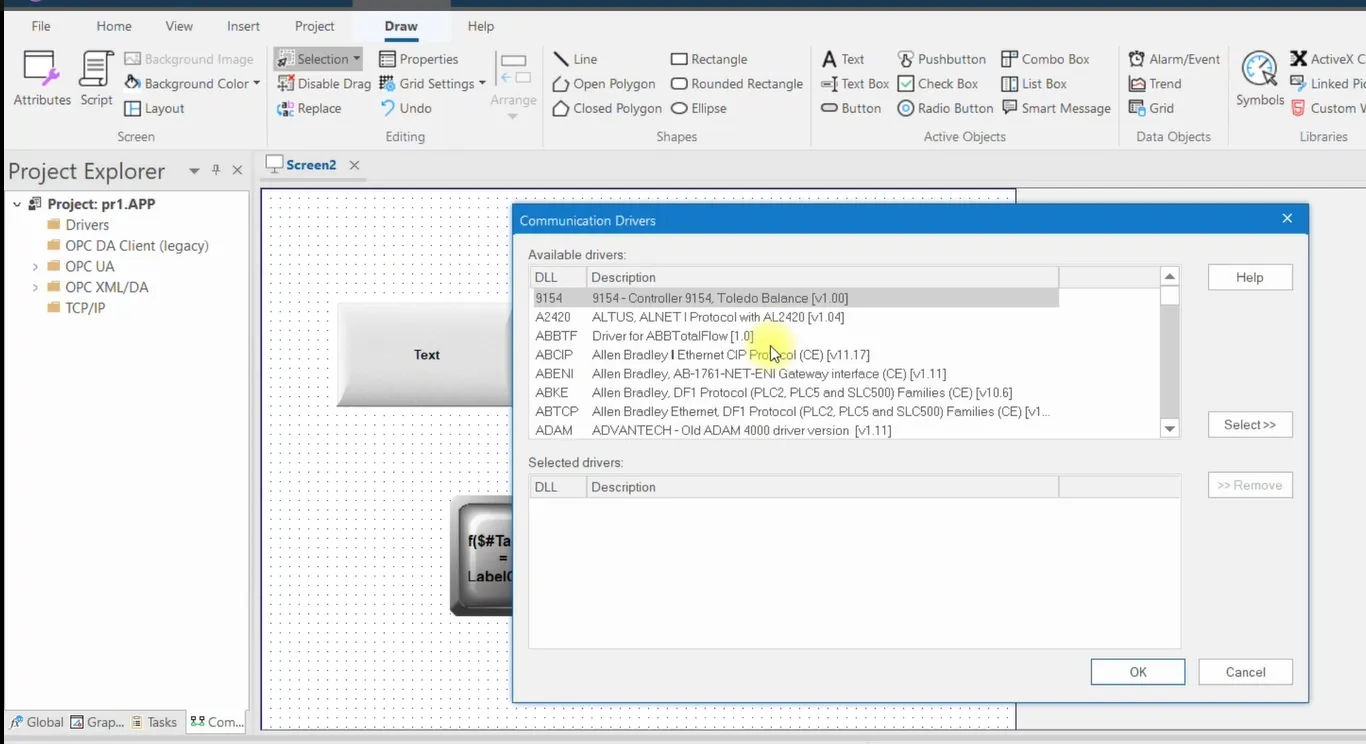
Communication in EcoStruxure Machine SCADA Expert
EcoStruxure Machine SCADA Expert provides robust communication capabilities to connect with a wide range of industrial devices. It supports nearly all types of PLCs, OPC servers, XML interfaces, and databases. This allows seamless data exchange between SCADA, field devices, and higher-level systems like MES or ERP.
Step-by-Step Guide to Configure Communication:
- Open your project and go to the Communication Configuration panel.
- Select Add Driver to create a new communication link.
- Browse and select the appropriate communication driver for your device or protocol (e.g., Modbus, OPC UA, BACnet).
- Click OK to add the driver to the project.
- Configure the driver settings such as device address, network parameters, and tag mapping.
- Save the configuration. SCADA is now ready to communicate with the connected PLC or device.
By properly configuring communication drivers, EcoStruxure Machine SCADA Expert ensures reliable data transfer, real-time monitoring, and effective control of industrial processes.
Add VBScript to Your Project in EcoStruxure Machine SCADA Expert
VBScript allows you to add custom logic to your SCADA project, automate tasks, and enhance interactivity. In this section, we will add a simple VBScript to display messages when a screen opens or closes.
Step-by-Step Guide:
- Open the screen where you want to add the script.
- Go to the Draw Menu and select Script to create a new VBScript.
- The Script Editor will open. By default, it contains subroutine templates such as:
- Sub OnOpen() – Executes when the screen opens.
- Sub OnWhile() – Executes continuously while the screen is open.
- Sub OnClose() – Executes when the screen closes.
- In Sub OnOpen(), add a simple message:
MsgBox "Welcome to SCADA". - In Sub OnClose(), add a message:
MsgBox "Screen is closing". - Save your script.
- To check for errors, right-click inside the Script Editor and select Check Script. If no errors are found, the script is ready; otherwise, correct any highlighted issues.
By using VBScript subroutines, you can execute custom actions automatically when screens open, run continuously, or close, making your SCADA project interactive and responsive.

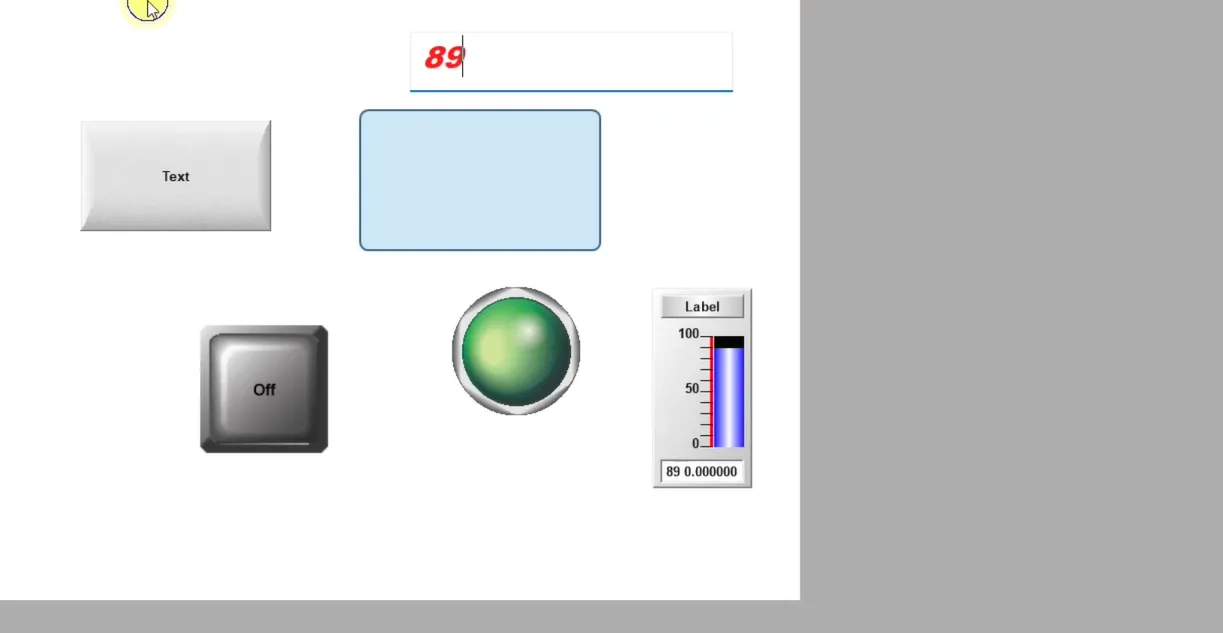
Save and Run Your Project in EcoStruxure Machine SCADA Expert
After creating and configuring your SCADA project, the next step is to save your work and run the project to test functionality. Running the project allows you to simulate screens, test scripts, check tags, and verify communication with PLCs or other devices.
Step-by-Step Guide:
- Ensure all changes are saved by going to the File menu and selecting Save.
- Click on the Run or Start button in the toolbar to launch the project simulation.
- The SCADA project will open in runtime mode, displaying all screens, components, and live data if connected.
- Verify that your VBScript, alarms, trends, buttons, and tags function correctly.
- If errors occur, stop the project, make corrections in the editor, save again, and re-run the project.
- Once verified, you can run the project on the target hardware or deploy it to the industrial system for operation.
Saving and running the project frequently during development ensures that your SCADA application is working as intended and reduces the risk of errors when deployed to live industrial environments.
Other Key Features in an EcoStruxure Machine SCADA Expert Project
In addition to screens, components, and scripts, a SCADA project in EcoStruxure Machine SCADA Expert includes several advanced features that enhance monitoring, control, and connectivity:
- Communication: Configure communication with PLCs, temperature controllers, motion devices, barcode/2D/RFID readers, and other industrial equipment.
- OPC Communication: Integrate with OPC servers using OPC UA, OPC DA, OPC XML, or OPC .NET interfaces for data exchange.
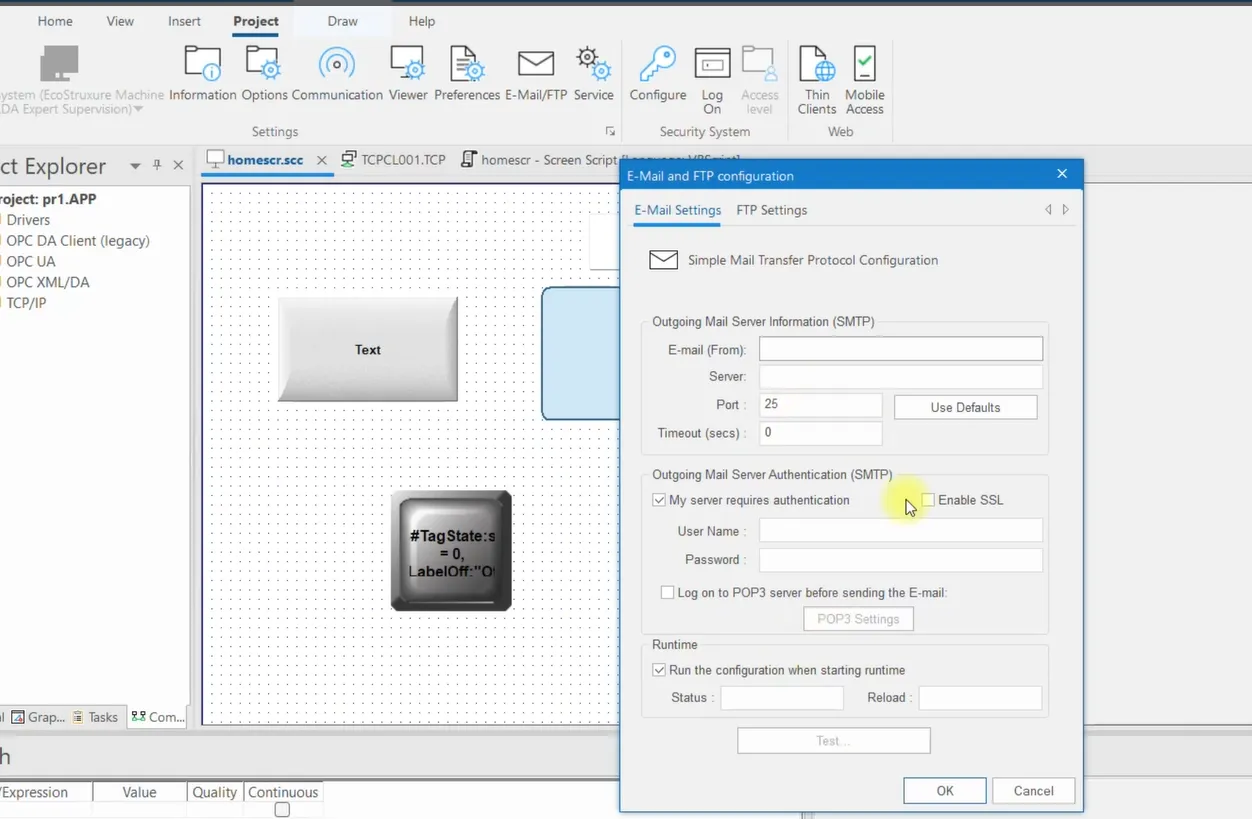
- Email Notifications: Set up automatic email alerts for alarms, events, or system messages.
- Security Settings: Manage user accounts, groups, permissions, and login policies to protect the SCADA system.
- Services: Configure background services such as logging, database access, trends, and report generation.
- Logon and Mobile Access: Enable secure remote access to your SCADA project via tablets, smartphones, or web browsers for monitoring and control from anywhere.
These features allow you to create a fully functional SCADA system that is secure, connected, and capable of providing real-time insights to operators and managers.
Adjust Runtime Settings for Proper Visualization
EcoStruxure Machine SCADA Expert allows you to customize runtime settings to ensure optimal visualization and user interaction on different devices. Adjusting these settings improves operator experience and ensures screens display correctly on monitors, tablets, or touch panels.
Step-by-Step Guide:
- Open your project and go to the Runtime Settings or Viewer Configuration panel.
- Adjust the Screen Resolution to match the monitor or panel you are using.
- Set window options, such as Minimized on startup or No Full Screen, depending on your preference.
- Configure Keyboard and Touch Settings to enable proper input and gestures for operator control.
- In the Viewer Settings, select options such as toolbar visibility, navigation behavior, and scaling for optimal display.
- Save the configuration and run the project to verify that screens appear correctly and all inputs function as expected.
Properly adjusting runtime and viewer settings ensures a seamless operator interface, enhances readability, and improves control precision across different display devices.
